Panko-crusted chicken breasts stay juicy inside. They also have a crispy outside. They’re the best choice! They give you the perfect bite every time. A light layer of seasoned flour and egg covers the chicken breasts. Crispy panko breadcrumbs give them a golden, crunchy crust. This adds texture without making them heavy or greasy.
This easy chicken dinner uses simple ingredients. You can cook it in a skillet or bake it in the oven. We love the skillet method for a deep golden colour and a crunchy crust. The oven method is handy when we’re making several other dishes at once.
Why We Love This Panko-Crusted Chicken
There are plenty of ways to prepare chicken breasts, but this recipe checks several boxes.
- Crispy exterior: Panko breadcrumbs make a light, crunchy crust. They are better than regular ones.
- Juicy chicken: Evenly sized chicken cutlets cook quickly without drying out.
- Easy ingredients: Most of the ingredients are pantry and refrigerator staples.
- Quick dinner: The chicken is on the table in about 30 minutes.
- Flexible seasoning: We can make the coating mild, herby, spicy, or cheesy.
- Two cooking options: Pan-frying creates a crispy crust. Baking provides a hands-off method.
- Family-friendly: The basic seasoning is mild enough for most dinner tables.
What Is Panko?
Panko is a Japanese-style breadcrumb known for its large, airy flakes. Panko creates a crunchier, more textured coating. It’s better than fine traditional breadcrumbs.
That’s exactly what we want here.
Panko doesn’t just form a thick layer on the chicken. Instead, it makes small pockets that turn delightfully crisp when cooked.
For this recipe, plain panko breadcrumbs are best. They let us control the salt and seasonings.
Ingredients for Panko-Crusted Chicken Breasts
For about 4 servings, you’ll need:
Chicken
- 2 large boneless, skinless chicken breasts
- 1/2 teaspoon salt
- 1/2 teaspoon black pepper
Flour Coating
- 1/2 cup all-purpose flour
- 1/2 teaspoon garlic powder
- 1/2 teaspoon onion powder
- 1/4 teaspoon salt
- 1/4 teaspoon black pepper
Egg Wash
- 1 large egg
- 1 tablespoon water
- For the Panko Coating
- 1 cup plain panko breadcrumbs
- 1/3 cup finely grated Parmesan cheese
- 1 teaspoon paprika
- 1 teaspoon Italian seasoning
- 1/2 teaspoon garlic powder
- 1/4 teaspoon salt
- 1/4 teaspoon black pepper
For Cooking
- 2 tablespoons olive oil
- 1 tablespoon butter
Ingredient Notes
Chicken Breasts
Large boneless, skinless chicken breasts work well, but their thickness can vary considerably. If one end is much thicker than the other, the thin part can dry out before the thickest section cooks.
We fix that issue by slicing the breasts into thinner cutlets. Then, we gently pound the thicker parts until all the pieces are about the same thickness.
Panko Breadcrumbs
Use plain panko rather than heavily seasoned breadcrumbs. This lets us control the flavour and makes the Parmesan, paprika, garlic, onion, and herbs shine.
Parmesan Cheese
Finely grated Parmesan blends into the panko instead of forming large clumps. It adds savoury flavour and helps the crust become beautifully golden.
Paprika
Paprika adds colour and a gentle earthy flavour. For more heat, use smoked paprika or a small pinch of cayenne.
Italian Seasoning
Italian seasoning gives the crust a familiar herbaceous flavour. You can also use dried oregano, basil, thyme, or a mix of your favourite dried herbs.
How to Make Panko Crusted Chicken Breasts
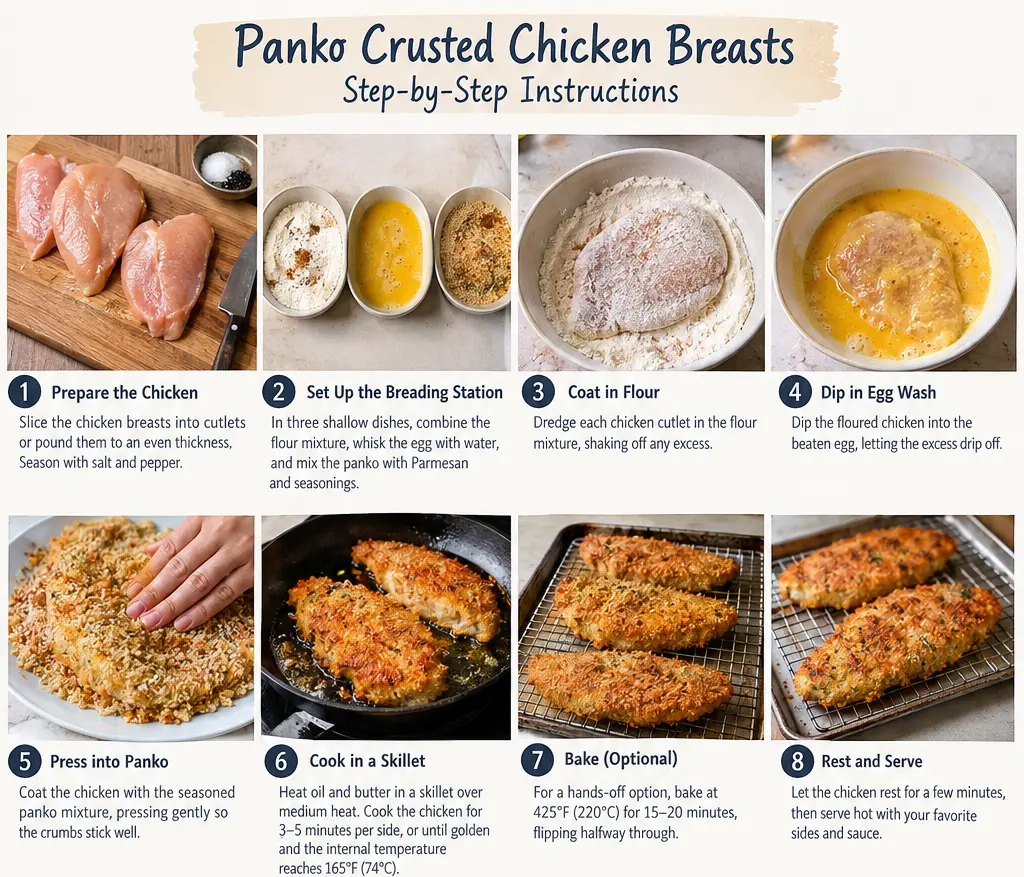
Step 1: Set Up the Breading Station
Use three shallow dishes.
In the first dish, combine the flour, garlic powder, onion powder, salt, and black pepper.
In the second dish, whisk the egg with a tablespoon of water.
For the third dish, mix panko breadcrumbs with Parmesan. Add paprika, Italian seasoning, garlic powder, salt, and black pepper.
Keeping everything arranged in this order makes the coating process much easier.
Step 2: Coat the Chicken in Flour
Take one seasoned chicken cutlet and place it into the flour mixture.
Turn it over to lightly coat both sides. Gently shake away excess flour.
We don’t want a thick layer of flour. A thin coating is enough to help the egg adhere to the chicken.
Step 3: Dip Into the Egg
Move the floured chicken into the egg wash.
Coat both sides thoroughly, then allow excess egg to drip back into the bowl.
This step is important. The egg adds the moisture that helps the panko mixture stick.
Step 4: Press Into the Panko
Transfer the egg-coated chicken to the seasoned panko.
Firmly press the breadcrumbs onto both sides of the chicken, especially the edges.
Don’t simply sprinkle breadcrumbs over the top. Gently pressing them into the chicken helps create a more complete crust.
Place the coated chicken on a clean plate or wire rack while preparing the remaining pieces.
Step 5: Cook the Chicken
For the skillet method, heat olive oil and butter in a large skillet over medium heat.
Once the fat is hot, carefully add the breaded chicken without overcrowding the pan.
Cook until the bottom is golden brown. Then, turn the chicken and cook the other side.
Exact cooking time depends on the chicken’s thickness. Use an instant-read thermometer to check the thickest part, not just the clock.
The chicken is ready when it reaches 165°F (74°C) internally.
Transfer the cooked chicken to a wire rack for a few minutes before serving.
How to Bake Panko Crusted Chicken
If we’d rather avoid pan-frying, we can bake the breaded chicken.
Preheat the oven to 425°F (220°C).
Place a wire rack over a baking sheet and lightly grease the rack. Arrange the breaded chicken pieces in a single layer.
For an especially crisp crust, lightly spray or brush the exposed panko with cooking oil.
Bake until the chicken is golden and the thickest portion reaches 165°F (74°C).
Cooking time usually ranges from 15 to 20 minutes, depending on the cutlet thickness. However, use a thermometer to check for doneness instead of relying on time.
Let the chicken rest briefly before serving.
How to Keep Panko Chicken Crispy
The biggest enemy of crispy breaded chicken is trapped steam.
After cooking, don’t stack the chicken pieces immediately. Instead, place them on a wire rack.
A plate can trap steam under the crust, softening the bottom.
Avoid covering freshly cooked chicken with foil. If keeping it warm matters more, that’s fine. Otherwise, let it stay crisp.
And one more thing: serve it soon after cooking. Panko is best when the crust is still hot and crunchy.
What to Serve With Panko Crusted Chicken
Crispy chicken goes well with many different sides.
Vegetables
Potatoes
Grains and Pasta
Sauces
A dipping sauce can take this chicken in a different direction.
Try:
How to Reheat Panko Chicken
For the best results, use an oven or air fryer rather than a microwave.
Oven
Place the chicken on a wire rack over a baking sheet and heat at around 375°F (190°C) until warmed through.
Air-fry at approximately 350–375°F (175–190°C) until the chicken is hot and the exterior has crisped again.
Microwave
The microwave is the fastest option, but it tends to soften the panko coating. If speed matters more than crunch, it still works.
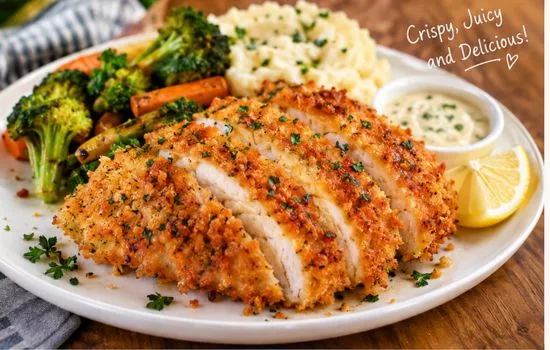

Crispy Panko Crusted Chicken Breasts
Ingredients
Method
- Slice the chicken breasts horizontally into thinner, evenly sized cutlets.
- Gently pound any thick areas until the chicken has a relatively even thickness.
- Season the chicken with part of the salt and black pepper.
- Mix flour, garlic powder, onion powder, salt, and pepper in a shallow dish.
- Whisk the egg with water in a second dish.
- Combine panko, Parmesan, paprika, Italian seasoning, garlic powder, salt, and pepper in a third dish.
- Coat each chicken cutlet in flour, shaking off excess.
- Dip the chicken into the egg wash and allow excess egg to drip away.
- Press the chicken firmly into the panko mixture on both sides.
- Heat olive oil and butter in a skillet over medium heat.
- Cook the chicken until golden brown on both sides and the thickest part reaches 165°F (74°C).
- Transfer the chicken to a wire rack and let it rest briefly.
- Serve immediately with your favorite sides and sauce.




5 thoughts on “Crispy Panko Crusted Chicken Breasts”